Showing posts with label Baked Goodies. Show all posts

Saturday, November 7, 2015

A Chocolate Truffle Cake (Eggless) and My 100th Post!!!

Blogging  has been a wonderful journey so far. It's been 4 years since I started and I've loved every moment of it. Though I was never active in the first few years, but once I became a stay at mother, I think I started doing it consistently.

A flashback is what I would like to share here this time..... Ever since I wanted to blog, I did not know what was it going to be about or how am I going to start. Then I stumbled upon this wonderful space called www.passionateaboutbaking.com


The blogger of this space is Deeba Rajpal. Her blog is like a picturesque village!!! Every picture speaks to you!! You feel like grabbing the food and gulping it down. Her food styling, photography and writing style made me fall in love with her. I never once commented on her blog posts, fearing what an amateur could say, but I always thought I could never ever tell anything of her picture because they were so perfect...


So looking at her blog, her pictures is what made me start my blog. I never wanted any fame from this blog, but being a food blogger and a passionate cook, I loved sharing my experiences with my friends and people who follow my blog. 

So today's post is entirely dedicated to my inspirer Deeba. My pictures are not even one drop close to hers, but I just love what I do!!! 


I took this recipe from her blog. It is a simple old fashioned chocolate cake. I made this into a chocolate truffle cake, as I love it!!!

The cake turned out moist and fluffy!!! I loved it totally!!! 


What would you need:

Makes: 2 8" cakes
Cooking Time: 35 - 40 minutes
Prep Time: 1 hour

Cake
  1. All purpose flour - 3 cups
  2. Sugar - 1 3/4 cup
  3. Unsweetened Cocoa Powder - 1/2 cup
  4. Baking Soda - 2 tsp
  5. Salt - 1 tsp
  6. Hot Water - 2 cups
  7. Vegetable Oil - 3/4 cup
  8. White Vinegar - 2 tbsp
  9. Vanilla Extract - 1 tbsp
Filling:
  1. Dark Chocolate - 200 grams (Chopped)
  2. Fresh Cream - 150 ml
How to go about it:
  • Line 2 8" tins with parchment paper or grease and dust the tins and keep aside.
  • In a bowl mix the flour, sugar, salt, cocoa powder, baking soda and whisk until everything is mixed. It is not necessary to use a hand blender. Keep this aside.
  • In another bowl, bring all the wet ingredients together i.e. oil, vinegar, vanilla extract and hot water. Whisk briskly until everything comes together.
  • Preheat the oven to 200 degrees Celsius for 10 minutes. 
  • While the oven is heating up. Mix both the wet and the dry ingredients together. Do not whisk hard. Just keep folding until everything comes together. If you have a few lumps it is alright. Do not worry about it.
  • Pour the batter equally into two cake tins and bake for about 35 - 40 minutes, depending on your oven. 
  • Cool the cake completely and then proceed to fill the cake with a filling of your choice.
Filling: Chocolate Ganache
  • In a sauce pan, add the chopped dark chocolate and the fresh cream. Heat it on a low flame and keep mixing until combined to a homogenous mixture.
  • Let it cool completely. It will thicken up as it cools.
  • Layer the cake with the ganache and refrigerate it.

Njoy with your loved ones...

Luv...

Champa

Thursday, August 20, 2015

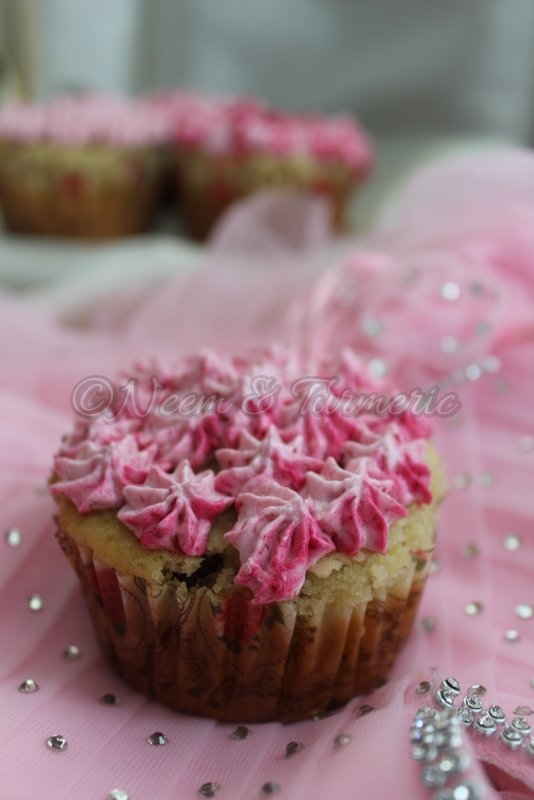
Mixed Berries & Vanilla Cupcake with Jam Whipped Cream Frosting


When you look at a cup cake,
you have got a smile
                                                    - Anne Byrn


Don't we all smile when we look at cute small cup cakes?? I smile excessively. Why?? because they are cute and sweet looking. 

Cupcakes are so nice to bake. They are easy, no fuss method goodies, both to make and savour!!. So many ideas pop up when you want to decorate them isn't?? 


Every time when someone is arriving from the states, I get some goodie bag that is sent by my brother in law and sister in law... he he he... yes, I have so many things to buy from there and try!! There one time trip will never be enough for my cravings. 

I've never tried blueberries, raspberries and blackberries. They all look so beautiful. This time I had asked my brother in law to send some dried berries through our family friend. And tadaaa!!! they arrived!! 


The minute they arrived, I started planning what to make. I wanted to make so many things!! but I did not have enough berries... ha ha ha ha.... So finally the cup cakes.

Today, a second cousin of my husband visited us. She is getting married this November and she loves baked goodies. So incorporated the wonderful berries in the cupcakes and let her enjoy. 


These cuppies were soft and moist. They were just melt in the mouth with the right amount of sweetness. She loved them and I loved seeing her happy happy face!!!

Cup cakes are so beautiful and are easy to make. They can be decorate with such beautiful frostings and are mess free to eat too.


Preparation Time: 20 minutes
Cooking Time: 20 - 25 minutes
Makes: 12 - 15 cupcakes
Recipe Adaptation: www.ruchiskitchen.com

What would you need:

For the cupcakes:
  1. Cake Flour - 1 1/2 cups (for 1 cup all purpose flour add 2 tbsp cornflour) 
  2. Baking Soda - 1 tsp
  3. Baking Powder - 1 tsp
  4. Sugar - 1/2 cup
  5. Unsalted Butter - 1/2 cup
  6. Salt - a pinch
  7. Milk - 1 tbsp
  8. Butter Milk - 1 1/4 cup
  9. Mixed & Dried Berries - 1 cup
For the frosting:
  1. Whipping Cream - 1/2 cup
  2. Mixed Fruit  Jam - 2 tbsp (I used home made)
How to go about it:
  1. In a bowl add all the dry ingredients - cake flour, baking soda, baking powder, salt. Sieve this mixture at least 3 - 4 times.
  2. Add the mixed berries to the flour mixture and keep aside.
  3. Line a muffin tray with cupcake liners and keep ready.
  4. In another bowl, add the butter and sugar. Cream both until light, fluffy and pale.
  5. To the creamed butter sugar mixture, add the buttermilk and fold gently and do not beat. 
  6. Add milk and vanilla essence and mix gently again. 
  7. Now, pre - heat the oven to 200 degree Celsius for 10 minutes. 
  8. Mix the liquid ingredients to the sieved flour mixture and mix very gently with a hand beater. Do not over beat. 
  9. You will get a creamy batter. Scoop out portions of the batter into the lined cupcake covers. Fill 1/2 - 2/3 rd of the cupcake liners and not more.
  10. Tap the tray once to settle the batter.
  11. Bake at 180 degree Celsius for 20 - 25 minutes. Once done, test them by poking the centre with a tooth pick. The tooth pick should come out clean. Cool them completely on a wire rack.
Frosting:
  1. While the cupcakes are baking, prepare the frosting.
  2. Take the whipping cream in a bowl and beat with an electric blender until you get stiff peaks.
  3. If you need to check the cream, tilt the bowl. The cream should stay kaput and should not fall down. 
  4. Pipe the frosting on to the cooled cuppies.

Njoy with your loved ones...

Luv...

Champa

Wednesday, July 15, 2015

Tea Kadai Butter Biscuit/ Chai Wala Butter Biscoot

College & School days are one of the best in one's life. The carefree life, the enjoyment, hour long chats and little little fights. They are never to be missed and always to be cherished. A lot of things I have enjoyed while I was studying, of which one most important was the Tea Kadai's that we friends used to venture to. 

We especially loved the butter biscuits that the tea shops sold. They were crisp and one bite.... they just melt in your mouth!!! Wow, just to enjoy those we use to venture to our tea shops near our college. 


So after buying my OTG, I'm living my passion for baking and this is one of those recipes that I chanced upon. 

These biscuits brought back those warm memories of my lovely carefree days!!! They were crunchy, melt in the mouth. With a mild hint of salt and not too overtly sweet but so addictive!!


While I was baking them the entire house was filled with the aroma of Vanilla. The minute my oven beeped I ran over to look at the beauties. Let them cool fast and took one bite!! Yup transported back to my lovely lovely days!!


Now let's move on to the recipe...

Recipe Adaptation: www.kannammacooks.com

What would you need:

1.     Butter - 1/2 cup (110 grams)
2.     Sugar (Fine) - 1/2 cup (65 grams)
3.     Maida - 1 cup (165 grams)
4.     Salt - 1/8 tsp
5.     Vanilla Extract - 1/2 tsp

How to go about it:
  • Bring all the ingredients to room temperature. If your sugar granules are a little big, then pulse them in the mixer for a minute or two and make it into fine granules. This way they are easy to mix with the butter.
  • Sift the flour and salt and keep aside.
  • First, add the butter and sugar to a bowl and beat them until pale and fluffy. 
         
  • Slowly add the sifted flour & salt to the beaten butter & sugar mixture and start bringing the dough together. At first you might feel the dough is a bit dry. Do not panic, the butter will absorb all of the maida and will become pliable.


  • Spread a cling foil on your working surface. Over the cling foil, add the mixed dough and make a log shape like shown below. Wrap the dough little firmly and refrigerate for an hour or overnight.
          

  • Meanwhile, pre heat your oven to 200°C for 10 minutes. Grease the baking tray with butter and dust with flour. You might also spread a parchment paper or a silicon sheet.
  • Now, take the refrigerated dough and cut biscuit of thickness ½ inches.


  • Arrange the cut biscuits on the tray with at least 2 inches gap between them; the biscuits expand, hence the gap.
  • Bake them at 180°C for 20 – 25 minutes. Half way through the process, invert the sides of the baking tray. That is the side which is inside would now be facing the oven door vice versa. If you are using a convection microwave you can skip this step.
  • Please note that the biscuits turn from brown to black very fast, hence start monitoring them form the 18th minute of baking.
  • Once done, remove them and cool them completely on a wire rack and store them in an airtight container.
Points to note:
  •  While mixing the beaten sugar butter mixture with maida:


o   If you feel the dough is a little dry, add very little milk to loosen up.
o   If you feel the dough is loose, add very little maida to tighten a bit.
  • Please use fine sugar granules, as they are much easier to beat with butter and mix fast with the butter.
  • Either use cup measurements or gram measurements. Please do not mix both as there might be slight variations.
  • If you are using a convection oven, you can bake them at 200°C instead of 180. Since I use an OTG I have done it at 180°C
  Njoy with your loved ones...

Luv..

Champa

Sunday, July 12, 2015

Whole Wheat Chilli & Herb Crackers

As I said in my earlier post, baking in my new oven is something that I'm enjoying a lot!!So this time was the wonderful crackers!!

Crackers!! the very name is so nice na?? They just snap when you break them and are very light. Not sweet (that is something I love) I'm no cookie person, I usually like savory items than sweets. Especially for coffee I love hot and spicy sides. I saw many posts on crackers and finally I created my own variety that I totally loved!!!


This is by far the most easiest... why?? just 4 main ingredients.
By far the healthiest... why?? no butter 
For those friends who don't want eggs... this is eggless...


What do you need:
  1. Whole Wheat Flour - 1 1/2 cups
  2. Oil - .125 cup (half of 1/4 cup) (15 ml)
  3. Salt - to taste
  4. Chilli Flakes - 1 tbsp (you can change according to you desired spice level)
  5. Mixed Herbs - 1 tbsp
  6. Water - 200 ml (chilled)
How to go about it:
  • First pre heat the oven. Spread a parchment paper on to your baking sheet and keep aside.

  •   In a bowl add the flour, chilli flakes, salt & mixed herbs and stir. Add the oil and mix. The                   mixture should appear like bread crumbs.


  • Now slowly add the water and bring the dough together. You would not need all of the water     (entire 200 ml). The dough should be like a puri dough. Firm, but not dry. Cover this dough for 10 minutes and keep aside.


  • Now, dust your working surface with flour. Take a portion of you dough and roll out into a thin chapathi. With a cookie cutter, cut out shape of your choice and make small holes on the cracker dough.


  •  Arrange them on the prepared baking tray and bake them at 180 degree centigrade for 5 - 10      minutes or until the sides of the cracker start to rise up. Keep a watch on them while they are    baking.


Njoy with your loved ones...

Luv...

Champa

Friday, July 10, 2015

Banana Loaf

Baking has been my most favorite thing in the world!!! My first baking memory was with  my cousin Balaji in my grand mother's oven, which should be filled with sand and then baking to be done. I remember very well that cake was for my grand father's birthday and he was a vegetarian. So we sneaked in eggs into the kitchen without him knowing. 

We baked our very first Vanilla Sponge Cake in that oven and that was the day my love affair with baking started. I was 16 back then.


Ever since I always always loved baking. Then my father gifted a convection microwave to my mother. Seldom she used!! I was the one who loved making goodies in it. Once I got married, I got my dear oven to Pune. I baked a lot of goodies including a wonderful bread Challah Bread in it. And then disaster struck!! My oven conked off!! Refused to even heat up. 

There went all my baking fantasies with it. It has been four years!!


Ever since that fateful incident I missed my oven very badly. Every time I look at the wonderful pictures of my friends making cake and cookies, I used to so badly feel for an oven!! I sometimes used to ask my hubby for me to buy one, but some commitment would arise and my oven would go the back burner. 


Very patiently I waited. Then our fourth anniversary came!! My hubby showed a model of Bajaj Majesty 45 litre model and asked whether I wanted. Would I lose a chance?? I just said without hesitation that I want!!! I want!! I want!!! Phew!! big story is it not??

My beauty arrived and I was so confused what to bake. Two over ripe bananas were calling out for help!! None of us at home are going to eat, so bling went the bulb!! Banana Loaf came!! 

I have adapted this recipe from Nigella Lawson. 


What would you need:
  1. Maida - 2 cups
  2. Sugar - 3/4 cup (you could go upto 1 cup)
  3. Bananas - 2
  4. Baking Soda - 1 tsp
  5. Baking Powder - 1/2 tsp
  6. Milk - 3 tbsp
  7. Chocochips - 1/2 cup (optional)
  8. Eggs - 2
  9. Oil - 1/2 cup
  10. Vanilla Essence - 1/2 tsp
  11. Loaf Tin - 9"
How to go about it:
  1. Bring all the ingredients to room temperature. Pre heat the oven. Grease the loaf tin or cake tin with Parchment Paper or butter.
  2. Beat the oil, sugar together nicely first. Then add the eggs and beat until everything is combined well and looks pale.
  
   3. Now mash the bananas and keep aside. 


   4. Beat the mashed banana into the egg sugar oil mixture. Add the vanilla essence. Now, sift the              flour, baking powder and baking soda once. 
   5. Slowly sift the flour into the beaten liquid mixture in batches. I did it in 2 batches. Do not beat            the mixture now. Lightly fold the flour and let everything come together without lumps.

   
  6. Now, pour the batter into the loaf tin and top it with chocolate chips. Bake at 200 degrees for 50 -      60 minutes, until the top coating turns brown.

   7. Once done, cool it completely on a wire rack and cut into slices. Serve with Whipping Cream or          Ice Cream or just enjoy like that!!


Njoy with your loved ones..

Luv...

Champa

Sunday, June 14, 2015

Japanese Sponge Cake (No Baking Powder & No Baking Soda)

Baking is one of most favorite things to do!!! I so love baking that the very aroma that fills the house is so tantalizing. My oven conked off a long time and ever since, I never got a chance to bake. I miss the aroma, the cake rising up to its glory and everything about baking.

Chefs Across Boundaries, an initiative started by a few of us foodies and bloggers gave me this wonderful opportunity to make this wonderful cake!!!

Every month is Chefs Across Boundaries, we have a new challenge. A new cuisine to learn and cook. The month of June was hosted by the gregarious Shaheen Ali of www.spoonforkandfood.com 

The cuisine of the month was Japanese. The minute I heard this, I was rather shocked than surprised because apart from Sushi & Noodles I just don't know anything. I have never even cooked anything from this cuisine. So then Google came to the rescue. But another shock was most of their food was non - vegetarian or they had ingredients which weren't easily available. 

Finally landed on this wonderful cake which had just he basic ingredients and was easy, yet tricky. 


Japanese Cuisine is just not about Sushi & Noodles. In fact they are masters in making beautiful looking desserts. 

A Japanese Sponge is very light, fluffy and is an important part of Western Style Desserts. This sponge uses no baking powder or baking soda and its just about beating eggs and sugar that makes the cake so wonderfully light.


There are two types of desserts Wagashi -  Japanese Style & Yogashi - Western Style. This is a Yogashi Dessert and is almost similar to a French Genoise Cake. 

Well beaten eggs and precise measurements of ingredients is the key to the success of this cake.


So now let's get down to the recipe. 

What you need:
  1. Flour (Maida) - 90 grams
  2. Sugar - 90 grams
  3. Vanila Essence - 1 tsp
  4. Eggs - 3
  5. Butter - 20 grams
  6. Milk - 1 tbsp
  7. 7" cake pan
  8. Parchment Paper
How to go about it:

1. All you ingredients must be at room temperature. 
2. First, melt the butter with the milk in a microwave. Not too hot. Just melted in the milk. Keep this 
aside. 
3. Sift the flour twice and keep aside. Cut a parchment paper according to the size of the cake pan. Place the paper on the bottom and along the sides of the pan. 
4. Pre heat the oven at 180 degree for 20 minutes.


5. Add the eggs and the sugar in a bowl. Keep this over a simmering water over low heat and whisk the eggs until it is luke warm and the sugar is dissolved. A double boiler set up.


6. Take the bowl of the pan. Now whisk the eggs until they are thick. This takes approximately 5 to 8 minutes. First start on with low speed and increase the speed. Do not over whisk. 


7. The consistency is called ribbon stage. The beaten mixture will fall like a ribbon. Stop whisking now.


8. Now, add the vanilla essence and with a spatula very gently fold the mixture. Do not use the beater anymore.

9. Sift the flour in 3 parts in to the mixture and very gently fold the flour in to it. Gentle because, you are not break the air incorporated into the eggs. This is the key to the lightness and spongy texture of the cake.

10. Finally, add the milk butter mixture and give a final fold. 


11. Put the cake pan into the oven and bake at 180 degree for 20 - 25 minutes.


Points to remember:
  1. The oven should be hot when you are putting the cake pan inside. Cold oven or warm oven will not make a good sponge.
  2. The eggs must be beaten well to incorporate air into them. This is the most important point.
  3. Do not open the oven in between to check the process. 
  4. Do not beat or whisk while you are adding the maida.
  5. Do not let the batter sit out after you have folded the maida into the egg sugar mixture. Immediately you need to put in the oven.
Njoy with your loved ones...

Luv..

Champa